How to get a Custom Email address?
How To Get A Custom Email Address
Despite being something that we all use every day, registering an email address is something that most people only spent a few minutes thinking about years or even decades ago. At a certain point, though, applying for jobs with loudmetal123@aol.com or cutiepie1986@yahoo.com becomes less than ideal.
So it’s time to find a new email address. It’s going to take some effort bringing all of your contacts and subscriptions up to speed, so you want to make sure it’s something that will last. Something that you won’t get sick of in a few years. Something that you’ll never have to change no matter what, even if your email provider goes out of business.
It’s time to get a custom email address using your personal domain name.
Email Addresses Structure
Before you register a unique email address, it’s important first to have a basic understanding of how an email address is structured so you’ll know what we’re talking about once we get a little more technical.
An email address is comprised of two main parts:
- Mailbox name
- Domain

Let’s go over these two parts, working backward.
Domain
Think of a domain as the home of your email address. Incoming messages will arrive at the domain, and from there will be sorted according to which person (or mailbox name) to be delivered to.
A domain name consists of two customizable parts:
- Domain (e.g. example in example.com)
- Top-level domain, or TLD (e.g. .com
in example.com). This can also be referred to as a domain extension.
There are many factors to consider when choosing which domain and TLD to use for your custom email address, which we’ll dive further into later in this article.
Mailbox Name
The mailbox name (also known as a local-part or account name) is what you’ll use to further specify where to direct incoming emails. If your domain is the home address, think of the mailbox name as you would each person’s name who lives at that address.
How to Create a Custom Email Address
Here are the four instructions you’ll need to get a unique domain email address:
- Register a domain name.
- Sign up for an email hosting service.
- Create a mailbox name.
- Configure your email address with an email client.
1. Register a domain name.
Choosing a domain provider
To register a domain name, you’ll first need to select a domain provider. Here are things to look for:
- No unexpected renewal costs – Many registrars will advertise a very cheap initial registration of your domain, and then set the renewal cost for additional years for much higher.
- Helpful customer support – To assist with setting up your domain and email address.
- Included WHOIS Privacy – This keeps your contact information hidden from online databases for spammers and hackers to find.
- Full control over your domain name – Some registrars will restrict your domain name for use with their own services and make it challenging to set it up with another email hosting service.
Finding a domain
Depending on your use case, the type of domain name that you should register will vary. Some common formats include:
- Personal name (e.g. johnsmith.com)
- Family name (e.g. smith.com)
- Brand or nickname (e.g. designerdoug.com)
- Company (e.g. falcondesign.com)
Once you have an idea of what type of domain you’re looking for, it’s time to start searching. Don’t get discouraged if the initial domain that you search for is already registered; there are millions of domains registered, and it is common to go through many searches to find something that you like and is available.
If you’re having a tough time finding something you like, here are some domain finding tips that you can try:
- If using multiple words in your domain, add a dash.
- Try a different format (e.g. just your last name instead of your full name, or create a brand name).
- Try a different top-level domain instead of .com like .design, .xyz, .co or any of the other 400+ options that are available.
Registering a domain name
After finding a domain, it’s time to register it. Simply add it to your cart, select a term length (typically between 1-10 years), enter your contact and billing information, and then register it.
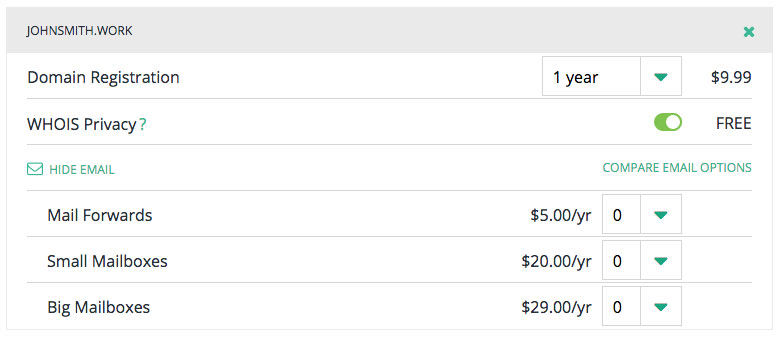
Example domain checkout. You may also have the option to purchase an email address from here.
Remember: Registering a domain name does not mean that you own it forever. Once the initial time you paid for has run up, you’ll need to renew it in order to continue owning it. If you do not do this, then you’ll no longer own the domain and it will be available for anyone else to register. Plus, your email will stop working. To make sure you don’t forget to renew your domain, make sure that you enable auto-renew within your account settings.
2. Sign up for an email hosting service.
Chances are that your domain provider will also offer email hosting services, but you do have the option to connect your domain elsewhere. Make sure that whoever you choose offers fair pricing, strong security, and plenty of storage. Your email host will handle the backend for your email address, meaning that it will communicate with the rest of the Internet to send and receive your emails, as well as store your incoming emails and files.
You have two options available when creating custom email addresses: forwards and mailboxes. A forward will pass any incoming emails to your custom address along to another email address of yours, but will not let you send emails from your custom address. A mailbox, on the other hand, will let you both send and receive emails from your domain email address.
3. Create a mailbox name.
You can create as many mailbox names as you’d like with your domain name, regardless of whether it’s just for a more professional email address for yourself or a business email addresses for 10,000 employees.
Mailbox names are typically a person’s name (e.g. johnsmith@example.com) or a department (e.g. support@example.com), but you are certainly welcome to create whichever mailbox names make the most sense for your use case.
4. Configure your email address with an email client.
Lastly, you’ll need some software to use your personalized email address with. Many email hosts will provide an email client to use, but you can choose whichever other programs you prefer to use.
The exact steps you’ll need to take will vary depending on the specific email client and hosting service you’re using, but will look something like this:
- Go into your settings.
- Add a new account.
- Enter your name, domain, email address, password, and a description of the email account.
- In both the Incoming and Outgoing Mail Server sections, enter your host name (e.g. mail.hover.com), user name (email address) and password. You’ll have the option of selecting either IMAP or POP. If supported, we recommend choosing IMAP because this will keep your messages in sync between all of the mail clients you use on all of your devices.
And that’s all there is to it! By following the above steps, you’ll be able to get your very own unique domain email address.


https://www.amazon.in/dp/B0892MZBKD hope you all are going to enjoy it
ReplyDelete